Tuesday, December 24, 2013

Christmas Dinner 2013

Merry Christmas, Happy New Year and Happy Holidays whatever your traditions are at this time of year!


We're hosting Christmas Dinner with my side of the family this year.  This means my parents, my sister and her significant other, his mom, her two kids and their spouses. 

I decided I wanted to try something I love but have never made myself before - a Leg of Lamb!  My parents don't care for lamb though, so we're also having ham.  Of course, we'll have appetizers, cookies and wine before dinner with plenty of conversation and family time.  We'll round out our meal with roasted potatoes, salad, cranberry sauce and finish with Poached Pears for dessert.

I have been busily mining Pinterest for recipes for the lamb and pears, here's the results:

We're having this lamb, ham, roasted potatoes which I simply toss in extra virgin olive oil, salt, pepper, thyme, fresh rosemary and plenty of whole cloves of garlic and roast at about 450 degrees until they are crisp on the outside and tender on the inside.  I've also decided to make these green beans, which not only pretty but sound delicious too. My sister is bringing the salad for which, I suspect, she'll whip up a fresh vinaigrette.  We're having Mulled Wine Sangria - a recipe from The Chew's Clinton Kelly - which I can hardly wait to try.   Finally I found this recipe for Poached Pears which we'll have for dessert - I think it sounds delightful and it shouldn't pose any problems for the many food issues our family members have these days. 

What are your plans for the holiday?

Friday, December 20, 2013

My Cheerios Breakfast/Snack Mix


My Cheerios Breakfast/Snack Mix 


When I first started my present job, I had a tough time adjusting to a full, 8 hour work day… or rather, my stomach did.  I had only worked a 6 hour day in my previous place of employment and would get home early enough to have dinner on the table by 5 or 5:30pm.  But now, I wasn't even leaving the office until 5pm and my stomach would grumble all the way home.  So, I did the logical thing and started packing an afternoon snack that I either ate at my desk in the late afternoon or in the car on the way home.  I started experimenting with cereal, but found it didn’t stick with me long enough, so I added nuts, but it was still missing something so I started adding dried fruit.  My favorite combination was Cheerios with walnuts and dried cranberries.  Eventually, I decided the combination was a bit dry and needed some salt too, so I started baking it in a bit of oil – this not only allowed the salt to stick – somewhat – but it also made the cereal and nuts toastier and crunchier – yummy! 
Well, I’ve been playing with this combination and tweaking it for almost a year now and I’ve finally arrived at the absolute perfect version of this tasty, crunchy and satisfying snack.  Somewhere along the way, I switched to eating it for breakfast and now I eat it for breakfast almost every day of the week – plus I find myself snacking on it in the evening when I’m watching TV or reading a book (it’s a lot less noisy than the popcorn popper) or as an afternoon snack at my desk if I don't eat it all in the morning. 
I start by setting the oven to 300 degrees and putting some butter and oil in a cast iron skillet or large roasting pan... I especially love the way this comes out when I bake it in a cast iron skillet, but I more often use a roasting pan since I generally make huge batches (which I do, pretty much once a week, then I find out I've eaten it up too quickly and have to make a small batch to get through the rest of the work week - tee hee)... 
... and I put it in the oven while the oven is preheating, so the butter melts and gets all bubbly and sizzly.
Now I add the Cheerios and Walnuts and stir it around so it all gets well-coated in the butter and oil...
I sprinkle in some salt at this point too, not a lot, I'll add more when it's done.  Then I bake it for 15 minutes until the walnuts and cereal are nicely toasted.  Let it cool just a bit, then add the dried cranberries.
And sprinkle on some salt...
It's very tasty while still warm - in fact, it would be a nice snack to serve warm to guests or to enjoy on a quiet snow day watching movies or curled up with a good book.  If you don't end up eating it all immediately, let it cool completely before storing in air-tight containers. 

Here’s the recipe for my final version, but feel free to play with it yourself – I’d love to hear what you come up with:

My Cheerios Breakfast/Snack Mix
2 tbls butter (regular, SALTED butter)
¼ cup cooking oil
6 cups Cheerios cereal
1 cup walnuts
1 cup dried cranberries (or dried fruit of your choice)
Salt to taste

Place butter and oil in a large cast iron skillet or roasting pan.  Place in oven and set oven to 300 degrees.  Remove pan from oven when oven comes to temperature.  Pour in Cheerios and walnuts.  Stir to coat.  Sprinkle liberally with salt and stir again.  Bake in oven for 15 minutes.  Remove from oven and allow toasted mixture to cool.  Add dried cranberries and sprinkle with a bit more salt.  Stir in.  Store in air-tight containers or zip-close bags.
Note:  If you want to make a small batch, the loose ratio I follow is 1/4 cup dried cranberries and 1/2 cup walnuts for every 2 cups of cereal.

Saturday, May 11, 2013

Creamy Mushroom and Pesto Pasta with Spinach

Do you ever have those nights when all you want is to plunk down in front of the TV (in your pjs or yoga pants and night shirt) with a bowl of tasty, comforting pasta and your favorite program or movie?  Confession:  I've been having a lot of these nights lately.  There's something about starting a new job, no matter how much you like it, no matter how great your coworkers are, and no matter how capable you are of completing the tasks of said new position that is stressful and exhausting.  Now double that by purchasing a business and doing both at the same time.

Hence, this pasta:

My husband and I liked this pasta so much, I made it twice in the same week!  It's earthy, creamy, hearty and extremely tasty.  It's great for a Meatless Monday meal, or if you're just a huge fan of mushrooms (like me).

Put some salted water on to boil for your pasta.  Then slice up some mushrooms,


Scallions...


Spinach (try to get baby spinach, if the leaves are small enough, you won't even need to chop them)...


And Parsley.  With any luck, your water is boiling and you can drop your pasta now.  If not, wait until you drop the pasta to heat up your skillet and start sauteeing.  Once you have dropped your pasta:

Throw the mushrooms in a skillet and sautee them for a couple of minutes...


Next, add the scallions to the skillet...


Saute these together for just a couple of minutes, when the mushrooms start to carmelize, season the whole shebang with a bit of salt and pepper, then add the spinach...


Sprinkle just a bit more salt on the spinach, then just let it hang out.  When it starts to wilt, give it a stir.


Once the spinach has cooked down a bit, add 4 oz. of Neufchatel Cheese (or other low-fat cream cheese) and half of a 7 oz. container of pesto.


Let everything hang out for a couple minutes to give the cheese a chance to melt a bit, then stir it all together. Your pasta should be ready now.  You can either drain it, first reserving about a cup of the pasta water or you can use a spider to transfer the pasta directly to the skillet (I love my spider for this!).


Add pasta water as needed to make a sauce, stir everything together and let it cook together for just a couple minutes.


Add some chopped fresh parsley and serve!


The best part of this dish, is it only takes as long to make as it takes to boil the water and cook the pasta.  YUM!

Creamy Mushroom & Pesto Pasta with Spinach

1 lb Bow Tie Pasta
4 oz. Nuefchatel Cheese (or low-fat cream cheese)
3.5 oz. Pesto (I like the kind you get in the fresh pasta aisle)
4-6 Mushrooms, sliced
3-5 Scallions, chopped
2 cups Spinach, chopped
2 Tbls Fresh Parsley, chopped
Salt & Pepper, to taste
2 TBLS Extra Virgin Olive Oil
1/4-1/2 cup Pasta Water

Put a large pot of salted water on  to boil.  Cook pasta to just shy of al-dente.

Preheat olive oil in a skillet.  Add mushroom, saute a couple minutes, then add scallions and sprinkle with salt.  Once mushrooms start to carmelize, add spinach, sprinkling a little salt on the spinach.  Let the spinach sit in the pan and steam with the mushroom and scallions, until it starts to wilt, then stir it in.  Sautee about 2 minutes, then add cream cheese and pesto.  Once cheese starts to melt, stir it in with the vegetables.  Add the pasta and approximately 1/4 cup pasta water.  Stir everything together and let it all cook together about 2 minutes, add more pasta water, as needed to make a creamy sauce.  Sprinkle with fresh, chopped parsley and serve hot with crusty bread.


Saturday, February 23, 2013

Prepping for the Week Ahead Part 1


I'm sorry I've been away for so long!  Like a lot of folks, life has been getting in the way of my "play" time, in my case, primarily, looking for work has been the culprit.  Fortunately, I finally found a position with a great organization and started work last week.  I have seven days under my belt and boy is my head spinning!  In addition to the job search, I have also been trying to eat healthier and exercise more.  I started that part of my journey last June (which, incidentally, was also about the same time I left my former job) when I found out my cholesterol was through the roof, but I really intensified my efforts in January after purchasing some bellydance workout DVDs in December and signing up with a workout and meal tracking website.  My primary goal is to exercise and eat healthy often enough  to be able to indulge in the cookies and other foods I love when the mood strikes me or on occasions when I am eating away from home.

I really struggled, however, my first 3 days back to work trying to get back into the routine. Between not getting up quite early enough in the morning to have breakfast and not finding time to workout after work I realized I needed to try something different if I wanted to keep progressing in my journey to a healthier me. 

So last week I took some steps that really helped.  I got up an hour earlier so I could work out and have breakfast before getting ready for work. I did some washing, chopping and storing of veggies to pack in lunches or to snack on while fixing dinner.  I baked some yummy mini-quiches (for which I found the recipe on Pinterest) to give me a quick breakfast option that wasn't cereal or oatmeal (which I like just fine, but don't wish to eat every day).   Bonus:  It helped my husband too, who rarely eats breakfast but who has been packing them for lunch.  I made two different versions of a cereal based snack mix which I often snack on while driving home from the office.  One more thing I made last weekend was a big batch of meatballs which I baked off, then froze in 8 oz portions for us to use for quick dinners any night of the week (woo hoo, spaghetti and meatballs for dinner tonight!).

I have the same mindset for this weekend - anything I can do to make our work week smoother - so this morning, I prepped carrot sticks, radishes and baked more mini-quiches and this afternoon I made brownies - after all, you gotta have treats too and comforting treats are even better - what's more comforting than chocolate?  For this post,  I thought I'd share how I "processed" the veggies with you and I promise to post Part 2 soon with the quiches and maybe, eventually, Parts 2, 3 and 4 with the meatball, snack mix and brownie recipes...

OK, OK, carrot sticks are certainly not rocket science, and it's by no means a new concept to slice them up and keep them in the fridge for snacking, but let's admit it, sometimes we need reminders...I know I did...

A couple of veggies we have been eating a lot of lately are carrots and radishes...Have you ever found yourself throwing away the radishes you bought because they got pushed into the back of the veggie drawer, forgotten and then proceeded to get slimy and yucky because the greens were still attached?  No?  Well, neither have I...much...Honestly, one of my local produce stands won't even carry radishes because they said they wasted too many of them.  (bear with me here, I promise I am going somewhere with this) They found their customers wouldn't buy them when they tried removing the greens, but the greens would go bad so quickly that people still wouldn't buy the radishes and they ended up throwing them away.  To combat this, when I buy radishes I like to remove the greens right away, but alas, getting home at almost 7pm because I did the grocery shopping after work and still needing to get dinner on the table really didn't lend itself to this process (I know, I know, I am a wimp!), so they were first priority this morning!  As you may already know, we have a small flock of chickens.  Chickens will eat just about anything (really) and I have found that their eggs are best when they get plenty of greens.  But they long ago decimated everything green in their pen so they have to rely on scraps from our kitchen...radishes are excellent in this capacity.  I have been buying two bunches at a time, since we like radishes (a lot) and that means a lot of greens for our flock.

So I started by filling a bowl with water, laying out a mason jar and grabbing the "chicken bowl", which is where we put all the kitchen scraps for the chickens, and a sharp knife.  I leave the radishes bunched together (are usually bound with a rubber band) and simply use a paring knife to separate the radishes from the greens.


Then I trim any remaining stem as well as the root...


And throw put the radishes in the bowl of water.  Radishes are usually grown in very sandy soil, so soaking in water will generally loosen the sand, which will float to the bottom.  If any of the radishes have mud or dirt clinging after they've been soaked, I just wipe them off with a paper towel and that usually does the trick...


Once all the radishes are soaking, the greens, stems and roots go into the chicken bowl. 


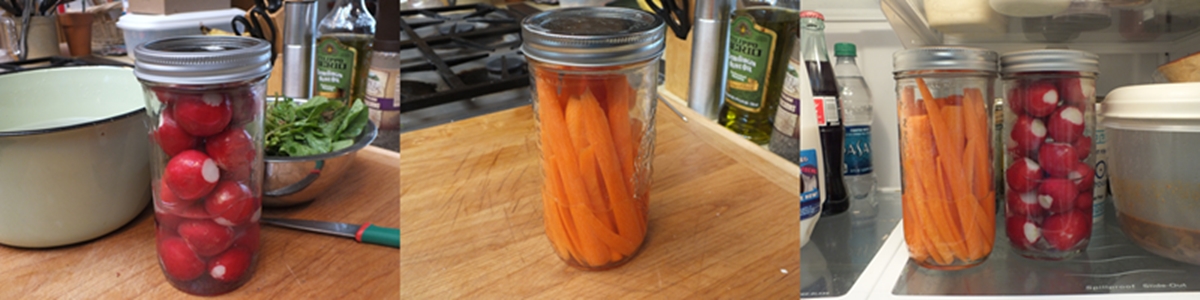
Then I put the radishes in a mason jar - this is really great since the jars are clear, which means you won't forget you have radishes in the container - and fill the first 1/4 of the jar with water, this keeps the radishes crisp, screw on the lid and place them in the fridge.  Why only 1/4 jar of water?  Well, I have found it provides just enough water to keep everything crisp but not so much water that your veggies freeze, split or turn soggy.  I do find that the carrots still curl, but I think that is pretty much unavoidable, so I don't lose any sleep over it.


I did pretty much the same thing with the carrots...


Peel and trim...


Cut into sticks...


Place in jar...


Peels, roots and stems go into the "chicken bowl"  (incidentally, this could also be a compost bowl)...


Fill jar about 1/4 with water, screw on lid...


Store 'em all in the fridge...


I like to place them front and center on a main shelf at eye level, this seems to help me to reach for them more often.  I hope you find this post useful - if you have tips and tricks you use to get through your busily scheduled lives, I'd love to hear about it!