Showing posts with label Asian Cuisine. Show all posts

Saturday, July 16, 2016

Haul: Seafood City

This has been a great, foodie week for me.  I got to do not one, but two hauls!  Unfortunately, I've had some technical difficulties with the first haul and now it may never get posted.  Fortunately, the second haul went just fine and it's all ready to share with you!


Please let me know if there are ethnic stores you'd like me to check out.  I'd love to hear about your experiences to, so please do comment below!

Ciao!


Saturday, May 7, 2016

Recipe Review: Gyoza


In my continuing quest to learn to make Asian Food, Gyoza was recently elevated in priority as a dish I needed to learn.

I was spending the day with my sister before she went on her official Honeymoon and we went to the butcher shop she and my new brother-in-law shop at and I found ground pork in the freezer section in 1 lb packages.  I knew, just knew, this was the ground pork that has always evaded me when I attempted to make Asian food in the past... so I picked up 2 packages with the intent to make Gyoza or Spring Rolls (or maybe both) with it.  But Gyoza was definitely wining the top spot in my mind so....

I decided to search YouTube for a video on how to make Gyoza and I found This Channel, EmmyMadeInJapan.  There's something about Emmy that I just love.  I have watched so many of her videos and I am thoroughly entertained by them.  I love her willingness to try anything and I'm finding I especially enjoy learning about what people in other parts of the world snack on.  Check out her Channel, seriously.

So Emmy has a super easy and delicious recipe for Gyoza, which I took for a test run.  Boy oh boy, did everyone in my gaming group love, love, love these little gems!

Here's how they go together.

I started with shredding the cabbage - I used Napa - and finely chopping the green onions and placing them in a bowl...


...and adding the ground pork and seasonings...


...and mixing it well until it's thoroughly combined...


...then the fun part comes - filling the Won Ton Skins or Gyoza wrappers.  I could only find the square Won Ton wrappers at my local grocery store...


...so it took me a bit to get the hang of how to pleat them.  Here's my first attempts:


...make sure not to overfill your Gyoza.  They are much easier to seal if there isn't filling trying to squish out at the seams.  I used only about 1/2 tsp per wrapper.  Eventually they started to look a lot better...


I was able to use up all of the wrappers in the package - I think there were 24 of them - so I took Emmy's advice and froze what I didn't need for our lunch.  Here's what they looked like when they were done - I served them with Emmy's sauce, it was super delicious and so, so simple...


I didn't change a thing about this recipe and there is no reason to - I will absolutely be making these again (and again, and again - in fact I dream of a freezer full of these so I can have them any time I want to).  They were fabulous and not as time-consuming as I expected.  Thanks for a great recipe, Emmy!


Wednesday, May 4, 2016

Make Your Own Takeout: Pork Fried Rice

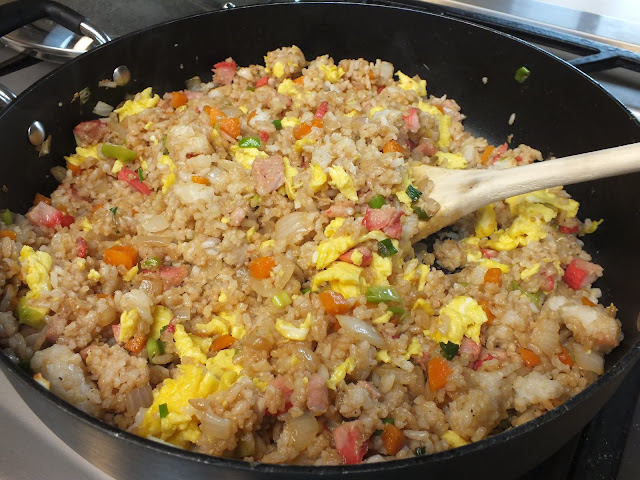
Pork Fried Rice

When it comes to food cravings I am generally pretty good at satisfying them right here at home.  Mostly we tend to crave Italian, Mexican and Pacific Northwest Seafood, but one cuisine that we generally go to a restaurant to curb our appetite for is Asian.  When I have lunch out on workdays, it's often Teriyaki or Pho and one of the few places my husband and I go for dinner is a local Chinese restaurant.  It's a totally Americanized Chinese menu - the type that was really popular back in the 70's, but we love it whether it's authentic or not (we honestly and perhaps sadly wouldn't know the difference) so I have made it my goal to master a few recipes myself and this Fried Rice recipe I found on Pinterest has been a great place to start.

Of course, this is me and I wouldn't be me if I didn't make at least an adjustment or two to our own liking, but I really haven't tweaked this recipe much at all.  I've really just swapped one ingredient for another, left out an ingredient (although I do intend to try it with it as well), and increased a couple others.

The key to good fried rice at home is to use rice that is a few days old and cold, right from the fridge. It will still taste delicious with freshly made rice, but the texture just won't match what your used to from your favorite restaurant or carry out place.

This recipe also happens to call for butter.  I've tried fried rice recipes before and this is the first I've come across with butter, but let me tell you, it works.  It's definitely the closest to our favorite restaurant's fried rice that I've made so far and it's definitely a recipe worth sharing.

This is also one time when I don't employ the chop and drop method of cooking.  I do chop up all the veggies and ingredients first because you'll be working pretty quickly.  So chop up your onion, carrots, garlic, scallion and Barbeque Pork and have them all set to go when you're ready.

For the carrots, I cut them in half, then half them again so they are 1/4 sticks...


Then chop them so I get small pieces like these:


If you have a wok, by all means use it, I used my non-stick skillet and it worked out just fine.  Preheat your pan over medium high heat and melt some of the butter until it's fully melted and bubbly...


Add your beaten eggs and scramble them until they are just done...


Remove them from the pan when they are cooked through and set them aside.  Do not overcook them, they will go back into the pan later and you don't want them to brown or dry out.


Melt some more butter in the pan, then throw in your carrots and onion, season with a bit of salt and pepper and stir-fry it for a bit - just until the onions and carrots become tender...


Add the last of your butter to the pan and stir it in until it's melted.  Now add your rice, scallions, pork and soy sauce...


Stir it in, breaking up any clumps of rice as you go with the back of a wooden spoon and let it cook for 2-3 more minutes.  Add the scrambled eggs and sesame oil - stir to combine...
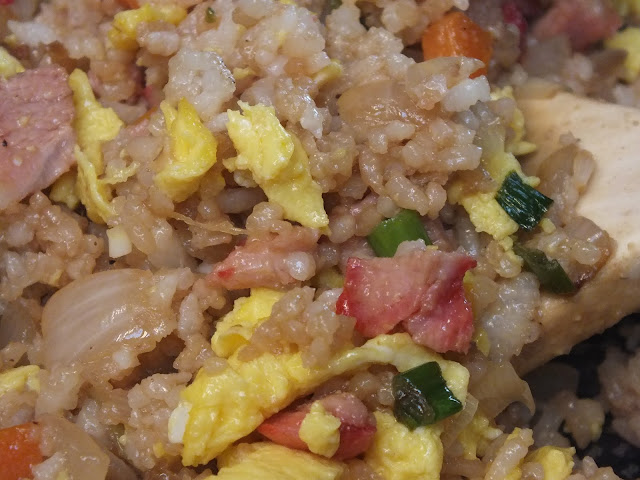
Fried Rice

At this point you can serve it or cover it and hold it warm in the oven at 225 degrees while you prepare more tasty Make Your Own Takeout dishes to accompany it.

Here's my modified version of the recipe:

Pork Fried Rice

4 TBLS unsalted butter, divided
3 eggs, beaten
2 medium carrots, peeled and chopped
1 small, sweet onion, chopped
3 cloves garlic, minced
1/4 lb BBQ pork, cut into bite-sized pieces
3 scallions, thinly sliced
4 Cups cooked and chilled rice
4 TBLS Soy Sauce (I used low sodium)
1/4 tsp toasted sesame oil

Preheat skillet or wok over medium high heat.  Melt 1 tablespoon of the butter until fully melted and bubbling.  Add egg and scramble until just cooked.  Remove from pan and set aside.

Melt 1 more tablespoon of the butter in the skillet until fully melted and bubbling.  Add onions, carrots and garlic.  Stir fry for 2-3 minutes just until onions become translucent and carrots start to become tender.

Add last 2 tablespoons of the butter to the skillet and stir in until melted.  Add rice, scallions and BBQ Pork to the skillet and stir in until well combined.  Stir fry for another 2-3 minutes.  Add soy sauce and eggs.  Stir to combine.  Add toasted sesame oil, stir to combine and remove from heat.

At this point you can serve it or cover it and hold it warm in a 225 oven while you make additional dishes to accompany your Pork Fried Rice.

Makes 4-6 servings.


Wednesday, April 20, 2016

Recipe Review: Chinese BBQ Pork


Awhile back, I had a troop of Girl Scouts over and we cooked Chinese food together.  Their Girl Scout Leader happened to have a family recipe for Chinese BBQ Pork which she made a brought along for us to add to the Fried Rice we made and to enjoy on it's own as well.  This really inspired me to renew my efforts to learn to cook Chinese Cuisine and sent me on a search to find my own go-to recipe for Chinese BBQ Pork so I could have it any time I craved it.

I searched and Pinned a couple of recipes to return to later and this recipe from Wanderlust Kitchen is the one I finally decided to try this weekend.

It was super easy to make, tender, juicy and the sauce is exactly right.  I opted to make it without the red food coloring but I made absolutely ZERO changes to the recipe and there is nothing I would change now that I've tried it.

Here's how it goes together:

Starting the night before, I mixed all the ingredients for the marinade in a mason jar...


The pork tenderloin came out of the package in two pieces, I cut each piece in half, pricked them all over with a fork (if there was one think I could have done better, this would be it - next time I'll prick it a bit deeper to really get that distinctive crust on the outside) and placed them in a resealable plastic bag.  Then I  poured half of the marinade on top, sealed the bag and massaged the marinade into the pork (this is easier if you let the air out of the bag when you seal it up).  Place it in the fridge overnight (or at least 6 hours) to marinade.

Before I roasted it, I let it sit on the counter a bit to take the chill off so it would be guaranteed to be tender while I worked on making Gyoza and Asian Noodle Salad to go with it.


It was roasted in a 450 degree oven for 25 minutes, until the internal temperature was 160 degrees.  It looked like this when it came out of the oven:


As per my usual MO, I let it rest several minutes before I sliced it up.


The marinade makes and excellent dipping sauce - I thought I'd have to thicken it up, but it was perfect just as is.  I loved this dish and my lunch guests (aka: Gaming Group) loved it and I will definitely be making this recipe again and again!


Wednesday, April 13, 2016

Make Your Own Takeout: Asian Noodle Salad


One of my cooking goals for years was to learn how to cook Chinese food, but I never had much success with the recipes I tried.  I had trouble finding the right ingredients and the flavors just never seemed to be quite right.  In the past year or so, this goal has broadened to that of learning to cook Asian food, in general.  Specifically the kinds of dishes I like to eat when I grab takeout at work or when Steven & I go out for dinner at our favorite, local Chinese place.  Today, my local grocery store carries a lot better variety of Asian ingredients and I'm finding I'm much more successful in achieving the results I'm looking for so now I'm truly on a mission to Make My Own Takeout.

One takeout dish I like to get from my office's favorite Pho place is a rice noodle bowl that is topped with skewers of lemongrass pork or shrimp or both.  They serve this dish with a dressing that is really light and tasty and is sesame oil-based.  It's very much like having Pho in a salad form and it was my inspiration for this Asian Noodle Salad.

I decided to make and Asian lunch for my Gaming Group this weekend and the weather was unseasonably warm - seriously, we had 80 degree weather in April.  These kinds of temperatures aren't usually enjoyed until July or August around here, so this was a real treat, but it also called for a change in menu for Saturday's lunch.  I had planned on making Chinese BBQ Pork, Gyoza and an Asian Noodle Stir Fry, also based on dish I enjoy from the same Pho place I just mentioned.  With the warm weather though, I really felt a cool salad dish would be more appropriate so I shifted my plan to make Asian Noodle Salad instead and this is how it went...

I boiled some vermicelli noodles in salted water.


While the noodles were cooking, I got started on the dressing which I made with lime juice, Extra Virgin Olive Oil, Sesame Oil, ginger, garlic, pepper and a bit of sugar...


My trusty microplane was my go to tool for just about everything I made for this meal.  I used it to zest the lime as well as mincing the garlic and ginger - I did this all right into a mason jar.  Then I squeezed the juice of the lime right into the mason jar as well and topped it with an equal amount of olive oil (I just do this by sight, it's ok if it's a tiny bit more or less) and topped that with about 1 tsp of sesame oil.  Finally, I added about a teaspoon of sugar - you can add more if you like it more sweet, but I wanted that bright, tartness of the lime to really shine through.  I placed the lid on the jar and then put the jar in the fridge to chill while I moved on with the rest of the salad.

Once the noodles were done (it only took about 5 minutes), I drained them and rinsed them in cold water to stop the cooking process and to fully cool the noodles so they wouldn't wilt the fresh ingredients...


...  I put the drained, cooled noodles in a large bowl and topped them with shredded Napa Cabbage (my personal favorite) and carrots that I julienned with a julienne peeler...


... and I topped that with mung beans and scallions...


... then I tossed the whole thing together and mixed it well.  I added a tiny drizzle of olive oil to help separate the noodles.  I refrigerated the whole thing at this point and dressed it right before serving.


It was a really delicious salad and everyone seemed to like it.  It was bright, light and refreshing and struck just the right balance for the warm dishes and weather.  I would love to add toasted almonds or peanuts to this for an added crunch and some protein and have it as a meal this summer when the weather is hot.

Give this salad and try and let me know what you do to make it your own, I'd love to hear your variations!

Asian Noodle Salad
Serves 8

8 oz Vermicelli Noodles
2 Cups Shredded Cabbage
1 Cup Shredded Carrots
1 Cup Mung Beans
2 Scallions, chopped

Dressing

Zest of 1 lime
Juice of 1 lime, approx. 2 TBLS
2 TBLS Extra Virgin Olive Oil
1 Tsp Sesame Oil
1 Tsp Sugar
1 clove garlic, minced
1 inch fresh ginger, minced
Black Pepper to taste

For the salad: Cook Vermicelli Noodles in boiling water until just al-dente.  Drain and rinse with cold water.  Place well-drained noodles in a large bowl. Add remaining salad ingredients and toss thoroughly.

Place all dressing ingredients in a mason jar.  Cover tightly and shake well.  Taste and make any adjustments you like.  Pour dressing over salad and toss again to coat everything well.  Serve.

Note: You can make this ahead for a later meal by keeping adding a little olive oil to the salad to keep the noodles from sticking together and waiting to dress it until meal time.  Just chill salad and dressing in the fridge separately.