Showing posts with label Gaming Food. Show all posts

Wednesday, June 8, 2016

Gaming Food: Sourdough Crust Pizza


There's no question, Pizza is the number one go to food of Gamers everywhere.  Whether it's Tabletop Role Playing Games, Video Games, Board Games or Poker, Pizza is King.  Not only is pizza convenient, and (assuming you live within the delivery area) quick - it's actually pretty economical - each player can chip in a few bucks and enjoy some hot slices packed with protein and carbs for a long night of gaming.

Sadly, one downfall of living in the toolies is No.Pizza.Delivery.  Admittedly, I've sufficiently spoiled my husband with homemade cooking to the point that he'd rather eat my cooking in most cases anyway, but there are times when it would just be so much easier to pick up the phone and order in. Gaming Night is definitely one of those times.

For the most recent Gaming Night with my group of gaming friends, we decided to set up a Make-Your-Own Pizza Bar with flatbread from this post (and video).  Then we had to reschedule our Game Night and Steven and I ate some pizzas with the flatbread and toppings.  The following week when we were once again scheduled to play, we decided to try again with the pizza bar, so I replenished some of the toppings, but forgot to pick up extra flatbread (Gaming is hungry play and you just never know how much each gamer will eat).  I didn't realize, until I'd already driven all the way home, that I had forgotten the extra flatbread so I decided to make some Sourdough Pizza Crust with a sourdough starter my sister gave me a few weeks earlier.

To make the crust, I started with my Mom's Pizza Dough from this Breakfast Pizza post and substituted 1/2 Cup of the Sourdough Starter for 1/2 Cup of the water in the recipe.  I measured out the starter into a 2 cup liquid measuring cup, then topped it off with the remaining water to total 1 1/4 cups of liquid.  I used cold water, so I wouldn't kill the starter and set it aside for about 10 minutes. Meanwhile, in the bowl of my mixer, I measured in 1 Cup of the flour and the salt.


Next, I added the 1/4 Cup of Olive Oil to the starter and water mixture and added it all to the flour and salt in the mixing bowl and turned the mixer on low and let it combine everything together and form a sponge.  I let it sit for about another 20 minutes, just to ensure that the yeast in the starter had a chance to activate.


Next, I added the final cup of flour and let the mixer finish combining everything until it came together in a beautiful, soft dough.  I lightly kneaded it and formed it into a ball...


...then sprayed the mixing bowl and top of the dough ball with a misting of Olive Oil, covered it tightly with plastic wrap and set it in a warm place to rise - it was a cold day so I took advantage of the heat from our wood stove and it did an admirable job.


This was only the second time I'd made bread using my starter, but it seems to take a lot longer to rise - so be patient and be sure to allow plenty of time to let the dough do it's thing.  We were playing on Sunday this time (it was Memorial Day Weekend), so I made the dough Saturday morning and it had all afternoon to rise.  Once it had doubled in size, I divided it into 4 roughly equal dough balls, placed them in zip-close bags and put them in the fridge to hold until Game Night.

The next step was to make my favorite pizza sauce and pre-cook some sausage.  I much prefer grating cheese by hand for things like pizza, it just melts so much better, but when it comes to Game Night, minimal preparation is key for achieving maximum playing time so I purchased pre-shredded Mozzarella as well as pre-sliced salami and pepperoni.  But alas, the sourdough crust was not to be - for we ended up having more than enough flatbread for the whole group - which is just a well because taking time to roll out pizza dough when we finally took our dinner break around 8:00 pm was just not going to do....  So Memorial Day rolled around and guess who had Sourdough Pizza for dinner?  You guessed it, yours truly and hubby!  :)  Here's how it all goes together:

Roll out the dough on a lightly floured board...


Top it with an even layer of sauce (Steven & I both prefer extra sauce, so ours are thick layers)...


Add salami and pepperoni...


...and any other flat toppings you prefer...


...top those with toppings such as sausage, olives, bell peppers and onions...


...finish them off with a nice layer of shredded Mozzarella cheese...


Bake at 425 degrees for 12-15 minutes, until the cheese is fully melted and starting to turn golden brown in spots.


Serve hot and enjoy!

Do you have a Game Night or other activity you enjoy with friends?  What are your favorite foods to eat when you get together?  I'd love to hear about them!

Until next time - Ciao!


Saturday, May 21, 2016

Casual Entertaining: Pulled Pork


Whether I'm gaming, crafting or just hanging out with friends and family, food is almost always included in the plans of the day.  I live out in the toolies, just close enough to civilization to be convenient and just far enough from civilization to be peaceful.  But this means guests are often on the road for an hour or more to get to my home for any kind of get together so a meal time is involved 99% of the time.

We're a pretty casual couple (big surprise being from Seattle, the casual capitol, right?) and we prefer meals to be casual as well.  We're big on having our guests make themselves at home and paper plates not an unusual occurrence - after all, who wants to worry about dishes when you can be visiting...or crafting... or gaming?  I ask you, who?!

Pulled Pork is an excellent recipe for casual entertaining.  I love foods that are versatile and Pulled Pork is definitely versatile.  You can pile it on a bun or roll with some BBQ sauce and some slaw for an excellent sandwich or use it as a topping for a baked potato.  (I like mine with pepper jack cheese, pulled pork, bbq sauce, bacon, scallions or chives and sour cream - YUM!)  It can be used as a topping for nachos or a filling for a quesadilla, wrap or burrito. See what I mean?  Versatile!

The best part about recipes like this one is you put a little effort into it at the beginning and then you can set it and forget it.

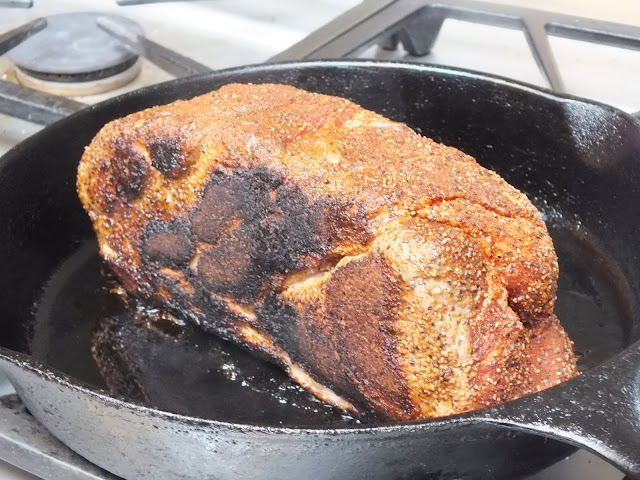
I used a pork shoulder for this, and started the night before - liberally applying a dry rub then wrapping it up tightly and placing it in the fridge until morning.  In the morning, I removed it from the fridge and let it sit on the counter about 30 minutes - all the major chefs will tell you this is an important step in cooking animal proteins, assuring the meat will retain moisture.  Preheat a cast iron skillet on medium high heat and sear the roast on all sides.


Once fully seared remove the roast to your crockpot or dutch oven and deglaze the pan.  Beer, apple cider, chicken stock and water will all work fine.  Just add 1/2 to 1 cup liquid and scrape all the lovely browned bits from the bottom of the pan and let it come to a boil.  Then turn off the heat and pour the liquid over the roast in your crockpot.  Cover and cook on low for 4-6 hours.  The roast should be fork tender and falling apart, if not, keep cooking it for another hour and check it again.

Remove it to a shallow bowl and allow it to cool a bit.  It's easiest to pull it apart with your hands, but if it's still too hot to handle you can use a couple of forks to do the job.


Wednesday, April 20, 2016

Recipe Review: Chinese BBQ Pork


Awhile back, I had a troop of Girl Scouts over and we cooked Chinese food together.  Their Girl Scout Leader happened to have a family recipe for Chinese BBQ Pork which she made a brought along for us to add to the Fried Rice we made and to enjoy on it's own as well.  This really inspired me to renew my efforts to learn to cook Chinese Cuisine and sent me on a search to find my own go-to recipe for Chinese BBQ Pork so I could have it any time I craved it.

I searched and Pinned a couple of recipes to return to later and this recipe from Wanderlust Kitchen is the one I finally decided to try this weekend.

It was super easy to make, tender, juicy and the sauce is exactly right.  I opted to make it without the red food coloring but I made absolutely ZERO changes to the recipe and there is nothing I would change now that I've tried it.

Here's how it goes together:

Starting the night before, I mixed all the ingredients for the marinade in a mason jar...


The pork tenderloin came out of the package in two pieces, I cut each piece in half, pricked them all over with a fork (if there was one think I could have done better, this would be it - next time I'll prick it a bit deeper to really get that distinctive crust on the outside) and placed them in a resealable plastic bag.  Then I  poured half of the marinade on top, sealed the bag and massaged the marinade into the pork (this is easier if you let the air out of the bag when you seal it up).  Place it in the fridge overnight (or at least 6 hours) to marinade.

Before I roasted it, I let it sit on the counter a bit to take the chill off so it would be guaranteed to be tender while I worked on making Gyoza and Asian Noodle Salad to go with it.


It was roasted in a 450 degree oven for 25 minutes, until the internal temperature was 160 degrees.  It looked like this when it came out of the oven:


As per my usual MO, I let it rest several minutes before I sliced it up.


The marinade makes and excellent dipping sauce - I thought I'd have to thicken it up, but it was perfect just as is.  I loved this dish and my lunch guests (aka: Gaming Group) loved it and I will definitely be making this recipe again and again!