Showing posts with label cooking blog. Show all posts

Wednesday, July 20, 2016

Lets Bake! Sourdough English Muffins


My sister gave me some sourdough starter back on Mother's Day and I have been having so much fun baking things with it.  4th of July weekend, my family came to stay with us and I/we made Sourdough Crackers (yes, crackers!) and these Sourdough English Muffins my sister has been making.  YUM!

These muffins come together so easily and they turn out crispy on the outside,fluffy on the inside with that fabulous, tangy flavor only sourdough can deliver.  They remind me of the Australian Toaster Biscuits that were popular for awhile (and which I haven't seen in my local grocery store for at least a few years now).  One thing about working with sourdough, you need to allow more time than you would for other types of breads.  In this case, making the dough the afternoon before and finishing the muffins the following morning.  They are super easy to make though and once you've made your own, you'll never want store-bought again!


Start by placing milk and butter in a microwave safe container and microwaving it on high for just 30 seconds - you actually don't want the butter to melt, just to soften a bit.  Much as with good pie crust or puff pastry, those bits of butter are what creates the unique texture of an English Muffin.  You need all those fabulous nooks and crannies so your butter can melt into them.  You'll mix in salt, honey (or sugar), and some yeast into that until it's all incorporated and then add your flour.  Cover the bowl with plastic wrap and let it sit on the counter until the following morning (which is when the fun really begins).

In the morning, you'll gather the dough into a ball, cut the dough into rounds using a cookie cutter or biscuit cutter and let them sit for 30 minutes before cooking them, They'll look like this:


Believe it or not, you don't bake them, you cook them on a griddle or in a cast iron skillet.


Before you know it you have a stack of English Muffins, right off the griddle, hot and ready for butter, jam or whatever you like!


I made a video of the process too, I hope you find it helpful:


We made Egg, Bacon and Cheese Breakfast Sandwiches with them - they were so good!


I hope you'll try these out and let me know how they turn out or if you put your own special twist on the recipe.  Speaking of the recipe:

Sourdough English Muffins

2/3 Cup Milk
1/3 Cup Unsalted Butter
1 Cup Sourdough Starter
1 tsp salt
1 tsp yeast
1 TBLS honey (or sugar)
1 Cup flour (I used bread flour)

Measure milk and butter into a microwave safe container and microwave on high for 30 seconds.  Measure sourdough starter into a large mixing bowl and add the milk and butter, salt, yeast and honey (or sugar).  Mix well.  Add flour and mix well.  The dough may be sticky at this point, that's ok.  Cover the bowl with plastic wrap and let it sit overnight (or at least until it doubles in size).

The next morning, gather the dough into a ball and knead more flour into it as needed (depending on the moisture content of your starter) until it comes together in a soft ball (think biscuit or scone texture).  Dust a cutting board or other working surface with flour or cornmeal (I used semolina flour) and turn the dough out onto the board.  Pat it into a flat disc, dust with flour or cornmeal, and using a rolling pin, gently roll it to about 1/2 inch thickness .  Cut into discs with a large, round cookie or biscuit cutter and set cut discs aside - being sure to dust them fully with cornmeal or flour. Re-form the pieces of dough into another ball and repeat until all the dough has been formed into discs, forming the final muffin by hand and flattening slightly with the rolling pin.  Let cut muffins rest uncovered for 30 minutes.

Preheat a griddle or cast iron skillet to medium-low heat.  Place muffins on preheated griddle and cook until golden brown on both sides.  Remove from heat, split with a fork and serve hot.

Until next time - Ciao!


Saturday, June 18, 2016

Cost Plus World Market Snack Haul Follow Up


Hi guys!  I posted a video of my favorite snacks from the Cost Plus World Market Snack Haul.


Is there a store where you like to shop for snacks or interesting foods?  Please share your thoughts, suggestions and recommendations in the comments - I always love to hear from you!

Wednesday, June 15, 2016

Gourmet at Home: Olive Tapenade


We love olives.  We do.  Because we love olives we almost always have a variety of them on hand in the fridge.  Recently, I was checking out the specialty items in the deli at my local grocery store and I noticed some Tapenade - it came in what might have been a 4 or 6 ounce jar - and they were charging $4.99 a jar!  I was both appalled at the price and reminded how easy it is to make yourself.  So I decided to show you how too.


There's really no recipe needed, just use 2 or 3 of your favorite types of olives, chop them up and serve with crackers or bread and your favorite cheeses, charcuterie and fruit or nuts and you have the perfect summer picnic, easy light dinner or cocktail party platter.  Check it out:


Ciao!

Wednesday, May 25, 2016

Tasting: Japanese Snack Pack


I have made no secret of the fact that I have been absolutely inspired by the YouTube Channel "EmmymadeinJapan" - and I submit as evidence, Article One Recipe Review: Gyoza.  This post and companion video must then be submitted as Article Two, I suppose.

Not long after viewing Emmy's Gyoza video, I watched Emmy Eats a Japanese Snack Pack.  Emmy has since made a least one additional Japanese Snack Pack Video.  This video really made me curious and excited to try some Japanese snacks and one day when I was placing an order for some cookie cutters I decided to throw in one of these packs to try for myself.

Here is the particular pack I purchased:


The fact that almost all of the labeling is in Japanese characters and that what little I could read in English was still unrecognizable to me added to the fun and adventure in trying these products out.  I was so excited when it all arrived!

There were 6 snacks inside...


This Big Katsu bar was the first snack I tried.  I realize now, that I should have made the connection to Chicken Katsu - apparently Katsu refers to the breading.


This next snack had a really interesting texture - now that I think about it post video, I guess I would describe it as being a sugary toast-like snack.  It definitely had a flavor and texture of lightly toasted bread...


My favorites in the whole pack were these rice crackers...


and these tube shaped, cheesy snacks...


I won't list all each individual snack here, you can watch the video to learn more about it.


I'd love to hear your thoughts on this.  Have you ever tried a snack pack?  What do you like to snack on?  Do you know what any of these are and where I can get more of my favorites?  Also, please do let me know if you like these types of posts and videos by leaving a comment, liking the video and subscribing or following the Channel or this Blog.

Thanks and Ciao!


Saturday, May 14, 2016

Quick Fix: Lemon-Pinoli Rice Pilaf


This Lemon-Pinoli (Pine Nut) Rice Pilaf is a great way to use up leftover rice.  It comes together super-quick and is really delicious.  The lemon gives the rice some brightness and makes it perfect for pairing with fish or chicken while the Pinoli, or Pine Nuts, add a nutty flavor and crunchy texture.  I threw in some parmesan cheese, which added another dimension of nutty flavor to the mix.  This dish will work with any rice you have on hand and you can add any fresh herbs you like to marry it to your main dish.

Here's the link to the video:


Here's the recipe:

2 TBLS pine nuts*, toasted
2 Cups cooked rice
1 TBLS extra virgin olive oil
Juice of 1/2 a lemon
1/4 Cup parmesan cheese
1/4-1/2 tsp dill* (fresh would be really lovely, I used dried because that's what I had on hand)
salt to taste

Start by toasting the pine nuts over low heat in a skillet.  Remove the Pinoli from the pan and set them aside once they are toasted to a golden brown.

Increase heat to medium high and add olive oil - allow it all to heat up a bit.  Add rice, stirring in to break up any clumps.  Stir in dill, lemon juice and salt (to taste).  Cover and reduce heat to low.  Let it hang out for about 5 minutes, until heated through.  Turn off heat.  Sprinkle with parmesan cheese and pine nuts.  Stir to combine and serve hot.    

*Note: you can reserve a few pine nuts and some dill (if you are using fresh) if you like, to use as a garnish.


Saturday, May 7, 2016

Recipe Review: Gyoza


In my continuing quest to learn to make Asian Food, Gyoza was recently elevated in priority as a dish I needed to learn.

I was spending the day with my sister before she went on her official Honeymoon and we went to the butcher shop she and my new brother-in-law shop at and I found ground pork in the freezer section in 1 lb packages.  I knew, just knew, this was the ground pork that has always evaded me when I attempted to make Asian food in the past... so I picked up 2 packages with the intent to make Gyoza or Spring Rolls (or maybe both) with it.  But Gyoza was definitely wining the top spot in my mind so....

I decided to search YouTube for a video on how to make Gyoza and I found This Channel, EmmyMadeInJapan.  There's something about Emmy that I just love.  I have watched so many of her videos and I am thoroughly entertained by them.  I love her willingness to try anything and I'm finding I especially enjoy learning about what people in other parts of the world snack on.  Check out her Channel, seriously.

So Emmy has a super easy and delicious recipe for Gyoza, which I took for a test run.  Boy oh boy, did everyone in my gaming group love, love, love these little gems!

Here's how they go together.

I started with shredding the cabbage - I used Napa - and finely chopping the green onions and placing them in a bowl...


...and adding the ground pork and seasonings...


...and mixing it well until it's thoroughly combined...


...then the fun part comes - filling the Won Ton Skins or Gyoza wrappers.  I could only find the square Won Ton wrappers at my local grocery store...


...so it took me a bit to get the hang of how to pleat them.  Here's my first attempts:


...make sure not to overfill your Gyoza.  They are much easier to seal if there isn't filling trying to squish out at the seams.  I used only about 1/2 tsp per wrapper.  Eventually they started to look a lot better...


I was able to use up all of the wrappers in the package - I think there were 24 of them - so I took Emmy's advice and froze what I didn't need for our lunch.  Here's what they looked like when they were done - I served them with Emmy's sauce, it was super delicious and so, so simple...


I didn't change a thing about this recipe and there is no reason to - I will absolutely be making these again (and again, and again - in fact I dream of a freezer full of these so I can have them any time I want to).  They were fabulous and not as time-consuming as I expected.  Thanks for a great recipe, Emmy!


Wednesday, May 4, 2016

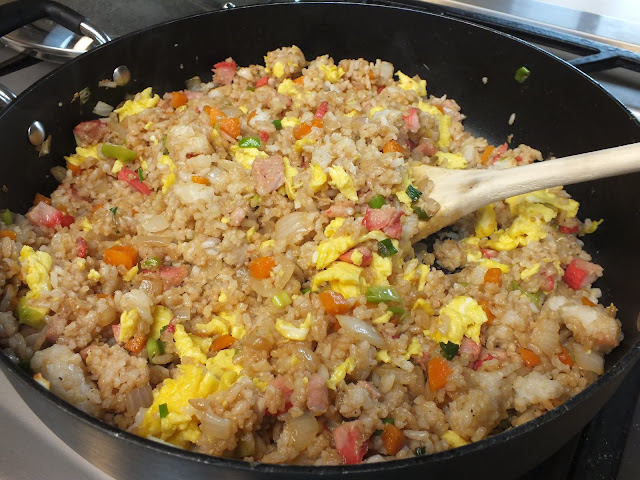
Make Your Own Takeout: Pork Fried Rice

Pork Fried Rice

When it comes to food cravings I am generally pretty good at satisfying them right here at home.  Mostly we tend to crave Italian, Mexican and Pacific Northwest Seafood, but one cuisine that we generally go to a restaurant to curb our appetite for is Asian.  When I have lunch out on workdays, it's often Teriyaki or Pho and one of the few places my husband and I go for dinner is a local Chinese restaurant.  It's a totally Americanized Chinese menu - the type that was really popular back in the 70's, but we love it whether it's authentic or not (we honestly and perhaps sadly wouldn't know the difference) so I have made it my goal to master a few recipes myself and this Fried Rice recipe I found on Pinterest has been a great place to start.

Of course, this is me and I wouldn't be me if I didn't make at least an adjustment or two to our own liking, but I really haven't tweaked this recipe much at all.  I've really just swapped one ingredient for another, left out an ingredient (although I do intend to try it with it as well), and increased a couple others.

The key to good fried rice at home is to use rice that is a few days old and cold, right from the fridge. It will still taste delicious with freshly made rice, but the texture just won't match what your used to from your favorite restaurant or carry out place.

This recipe also happens to call for butter.  I've tried fried rice recipes before and this is the first I've come across with butter, but let me tell you, it works.  It's definitely the closest to our favorite restaurant's fried rice that I've made so far and it's definitely a recipe worth sharing.

This is also one time when I don't employ the chop and drop method of cooking.  I do chop up all the veggies and ingredients first because you'll be working pretty quickly.  So chop up your onion, carrots, garlic, scallion and Barbeque Pork and have them all set to go when you're ready.

For the carrots, I cut them in half, then half them again so they are 1/4 sticks...


Then chop them so I get small pieces like these:


If you have a wok, by all means use it, I used my non-stick skillet and it worked out just fine.  Preheat your pan over medium high heat and melt some of the butter until it's fully melted and bubbly...


Add your beaten eggs and scramble them until they are just done...


Remove them from the pan when they are cooked through and set them aside.  Do not overcook them, they will go back into the pan later and you don't want them to brown or dry out.


Melt some more butter in the pan, then throw in your carrots and onion, season with a bit of salt and pepper and stir-fry it for a bit - just until the onions and carrots become tender...


Add the last of your butter to the pan and stir it in until it's melted.  Now add your rice, scallions, pork and soy sauce...


Stir it in, breaking up any clumps of rice as you go with the back of a wooden spoon and let it cook for 2-3 more minutes.  Add the scrambled eggs and sesame oil - stir to combine...

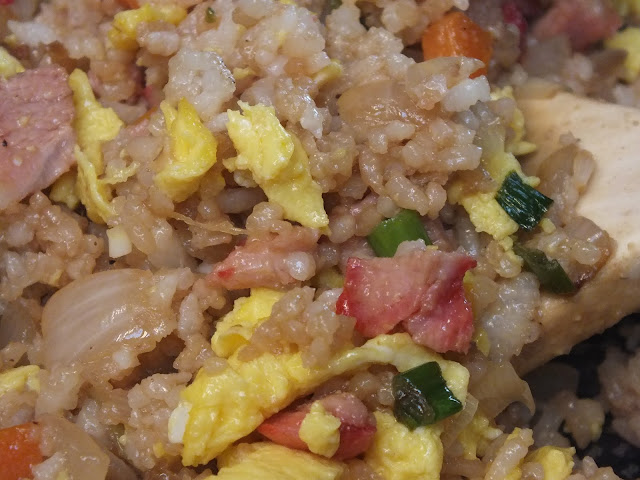
Fried Rice

At this point you can serve it or cover it and hold it warm in the oven at 225 degrees while you prepare more tasty Make Your Own Takeout dishes to accompany it.

Here's my modified version of the recipe:

Pork Fried Rice

4 TBLS unsalted butter, divided
3 eggs, beaten
2 medium carrots, peeled and chopped
1 small, sweet onion, chopped
3 cloves garlic, minced
1/4 lb BBQ pork, cut into bite-sized pieces
3 scallions, thinly sliced
4 Cups cooked and chilled rice
4 TBLS Soy Sauce (I used low sodium)
1/4 tsp toasted sesame oil

Preheat skillet or wok over medium high heat.  Melt 1 tablespoon of the butter until fully melted and bubbling.  Add egg and scramble until just cooked.  Remove from pan and set aside.

Melt 1 more tablespoon of the butter in the skillet until fully melted and bubbling.  Add onions, carrots and garlic.  Stir fry for 2-3 minutes just until onions become translucent and carrots start to become tender.

Add last 2 tablespoons of the butter to the skillet and stir in until melted.  Add rice, scallions and BBQ Pork to the skillet and stir in until well combined.  Stir fry for another 2-3 minutes.  Add soy sauce and eggs.  Stir to combine.  Add toasted sesame oil, stir to combine and remove from heat.

At this point you can serve it or cover it and hold it warm in a 225 oven while you make additional dishes to accompany your Pork Fried Rice.

Makes 4-6 servings.


Saturday, April 30, 2016

Quick Fix: Salmon in Parchment


Welcome to Quick Fix, a series of posts and videos I'll be sharing for recipes that are quick and easy to make.  For this first installment, I'm sharing Salmon in Parchment.  This is not only a quick and easy way to bake salmon, but it's also very reliable and my favorite way to prepare fish indoors. The fish always comes out tender, flaky and full of flavor.

Here's the video so you can follow along if you like:


And here's the instructions.

Preheat oven to 400 degrees.

For this recipe you'll need:
sheet pan
parchment
salmon filet (or any other fish)
1 lemon
2 cloves garlic, minced
dill
salt

Place a sheet of parchment on the sheet pan - making sure to tear off a big enough piece to enclose the salmon in.  Place salmon on parchment and season liberally with salt.  Slice lemon and place slices on top of salmon.  Sprinkle with dill and garlic.

Fold parchment around salmon, forming a pouch.  Bake 15-20 minutes, depending on the thickness of the fish.  It should easily flake away when checked with a fork.

I hope you'll tune in and try this method. I'd love to hear how you make it your own!


Sunday, March 20, 2016

Tutorial: Hiking Boot Cookies


Today is the first day of Spring - HOORAY!  That means hiking season is almost upon us.  To get your ramped up for the season, I wanted to share this tutorial with you for Hiking Boot Cookies.

Last July, my sister got married.  She and her new hubby started out their relationship hiking together and it grew from there so when they planned their wedding, they planned a casual, hiking themed wedding that was as much fun for the guests as it was for them.  It was very laid back and casual (and it was held on what turned out to be the hottest day of the summer - yikes!) and the menu was no different.

They picked a casual menu and asked me to oversee the shopping, cooking and preparing of the food, which included a special request for a platter of hiking themed cookies.  Here's what they looked like:


I decided to use Lila Loa's End All for Chocolate Cookies Recipe for a couple of reasons.
1) the chocolate cookie would show through on the boot-print scene cookie and look like earth, adding to the overall effect
2) They are absolutely the best, most reliable cut-out cookie recipe I have ever used - these cookies DO NOT SPREAD when you bake them - which makes them perfect for cut-outs

For the Royal Icing, I always use this recipe from The Sweet Adventures of Sugarbelle.  I've found it to be a reliable recipe and tastier than most Royal Icing recipes I've had.  You can also find lots of tutorials and excellent tips on this blog, and I highly recommend it if Royal Icing Cookies are something you enjoy playing with.

I had no trouble finding a basic idea for the backpack and bootprint cookies, but I had no luck finding anything for the hiking boot.  So, I figured it out for myself and took pictures of every step (ha ha, see what I did there?), so I could share them here...

Once you have cut and baked your roll out cookies, allow them to cool completely.  Still-warm cookies will result in runny frosting - a disaster for this type of decorating.


I mixed up a dark gray Royal Icing and thinned it to a 20 second consistency.  This is just thick enough to hold a line, but thin enough to use as a flood icing to fill in the outlines. I started with the bottom of the sole...


...while that was drying, I added the upper edge that you see on so many pairs of hiking boots...


...and while those details were drying (and while I was adding details to some of the other cookie shapes that used this same color), I mixed up a light tan color, which I also thinned to a 20 second consistency.  I sealed it up and let the other details set before filling in a flooding the body of the boot while the body of the boot was still try I thinned the grey icing even more - to about a 10 second consistency (maybe less) and added the eyelets to the boots, using a small round tip, and just dropping a tiny dot of icing in a row.  This results in the added icing sinking into the icing that's already there, while still holding it's shape.


Now I used the Royal Icing straight up, with just coloring to add the lacing...


On one cookie, I also added their initials and the date of the Big Day to place on the top of the cookie platter.


And there you have it, Hiking Boot Cookies for a Hiking or Camping themed cookie platter!