Showing posts with label cooking blogs. Show all posts

Wednesday, June 1, 2016

Haul: Cost Plus World Market Snacks


Do you ever feel like you're in a rut, food-wise?  I do.  Even though I love food - a good variety of food and love to cook  I have found lately that I am ready to try and experience new foods.  Not just recipes for meals, but snacks too.  I indulge several flavors and styles of chips and crackers, I love popcorn, all kinds of nuts and seeds and even though I mostly prefer to snack on salty, crunchy foods, I also enjoy cookies (rarely store-bought any more), ice cream, chocolate and few other kinds of candies.  Even so, I've often found myself completely stumped recently in the chips aisle preparing for a Gaming session with my friends, unable to decide which chips to get and completely uninspired by the choices.

Solution?  A trip to Cost Plus World Market to pick up a sampling of snacks and goodies from their grocery section!  I have recently re-discovered my love of this store thanks to my co-workers who suggested we shop for Christmas Cards there this past holiday season.  Our office is just minutes away from one of these fabulous, fun stores and I found myself wanting to spend all day there checking out the interesting snacks from all over the world.


A couple of weeks ago, I took a little time off which included leaving the office at lunch hour on a Thursday and taking the following day off as well.  The idea was to go clothes shopping, then spend the weekend with my sister getting pedicures and enjoying the last opera of the season.  I'm not a big fan of shopping for clothes for myself and I had been wanting to stop in to Cost Plus World Market to check out their snack selection again so I made that my first stop - a pre-shopping reward, you might say.


I had a lot of fun there and found so many interesting snacks and treats to try... here's the video:


I did manage to pick up some new clothes and since then I have been slowly trying each of the snacks.  So far my favorites have been the Crab Curry Thai Rice Crackers and the Coconut Candy, but I still have quite a few things to try.  Now that's my idea of shopping!  Next visit, I hope to pick up a couple of great things I saw for the kitchen.


Where do you turn to for food inspiration?  What's grabbing your attention right now with regards to food and, specifically, snacks?  Have you had any of these snacks?  I'd love to hear your thoughts and ideas.  As always, please let me know if you like these types of posts/videos by commenting below, following this blog and/or subscribing to my Channel and sharing.

Ciao!


Saturday, May 28, 2016

Tips and Tricks: The Indian Grocer


This is my first post and video for my new series "Tips and Tricks".  Today's tip is to explore your local ethnic grocery stores.  Specifically, for this post, I'm going to talk about the Indian Grocer.

About 9 years ago, I was introduced to a local Indian Grocery Store.  I was lucky enough to have a friend along who knew what was what and who acted as our personal guide.  I have been buying some of my spices there ever since.

I mainly stop by the Indian Grocer for Whole Cumin Seeds.  I use cumin a lot and I have found that by purchasing it this way, I not only save money but also get a lot more bang for my buck!

Here's the video:


Do you shop at a local ethnic grocer?  What types of things do you buy there?  I'd love to hear your thoughts and experiences.  Also, please do let me know if you enjoy these types of posts and videos!

Ciao!


Wednesday, May 4, 2016

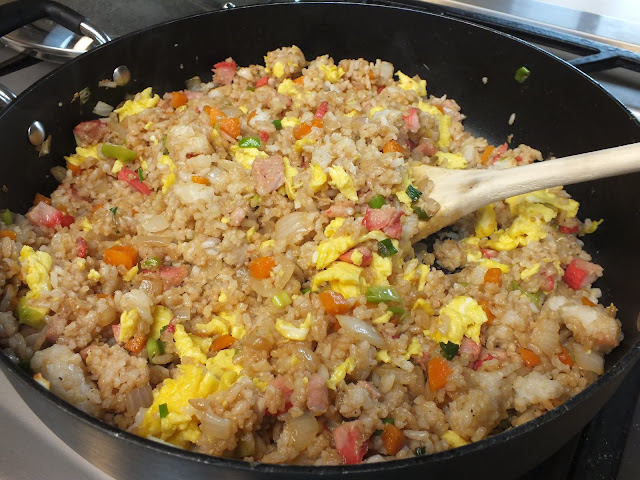
Make Your Own Takeout: Pork Fried Rice

Pork Fried Rice

When it comes to food cravings I am generally pretty good at satisfying them right here at home.  Mostly we tend to crave Italian, Mexican and Pacific Northwest Seafood, but one cuisine that we generally go to a restaurant to curb our appetite for is Asian.  When I have lunch out on workdays, it's often Teriyaki or Pho and one of the few places my husband and I go for dinner is a local Chinese restaurant.  It's a totally Americanized Chinese menu - the type that was really popular back in the 70's, but we love it whether it's authentic or not (we honestly and perhaps sadly wouldn't know the difference) so I have made it my goal to master a few recipes myself and this Fried Rice recipe I found on Pinterest has been a great place to start.

Of course, this is me and I wouldn't be me if I didn't make at least an adjustment or two to our own liking, but I really haven't tweaked this recipe much at all.  I've really just swapped one ingredient for another, left out an ingredient (although I do intend to try it with it as well), and increased a couple others.

The key to good fried rice at home is to use rice that is a few days old and cold, right from the fridge. It will still taste delicious with freshly made rice, but the texture just won't match what your used to from your favorite restaurant or carry out place.

This recipe also happens to call for butter.  I've tried fried rice recipes before and this is the first I've come across with butter, but let me tell you, it works.  It's definitely the closest to our favorite restaurant's fried rice that I've made so far and it's definitely a recipe worth sharing.

This is also one time when I don't employ the chop and drop method of cooking.  I do chop up all the veggies and ingredients first because you'll be working pretty quickly.  So chop up your onion, carrots, garlic, scallion and Barbeque Pork and have them all set to go when you're ready.

For the carrots, I cut them in half, then half them again so they are 1/4 sticks...


Then chop them so I get small pieces like these:


If you have a wok, by all means use it, I used my non-stick skillet and it worked out just fine.  Preheat your pan over medium high heat and melt some of the butter until it's fully melted and bubbly...


Add your beaten eggs and scramble them until they are just done...


Remove them from the pan when they are cooked through and set them aside.  Do not overcook them, they will go back into the pan later and you don't want them to brown or dry out.


Melt some more butter in the pan, then throw in your carrots and onion, season with a bit of salt and pepper and stir-fry it for a bit - just until the onions and carrots become tender...


Add the last of your butter to the pan and stir it in until it's melted.  Now add your rice, scallions, pork and soy sauce...


Stir it in, breaking up any clumps of rice as you go with the back of a wooden spoon and let it cook for 2-3 more minutes.  Add the scrambled eggs and sesame oil - stir to combine...

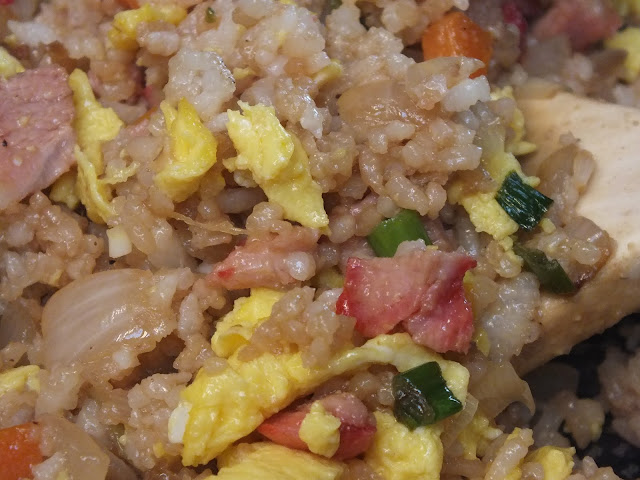
Fried Rice

At this point you can serve it or cover it and hold it warm in the oven at 225 degrees while you prepare more tasty Make Your Own Takeout dishes to accompany it.

Here's my modified version of the recipe:

Pork Fried Rice

4 TBLS unsalted butter, divided
3 eggs, beaten
2 medium carrots, peeled and chopped
1 small, sweet onion, chopped
3 cloves garlic, minced
1/4 lb BBQ pork, cut into bite-sized pieces
3 scallions, thinly sliced
4 Cups cooked and chilled rice
4 TBLS Soy Sauce (I used low sodium)
1/4 tsp toasted sesame oil

Preheat skillet or wok over medium high heat.  Melt 1 tablespoon of the butter until fully melted and bubbling.  Add egg and scramble until just cooked.  Remove from pan and set aside.

Melt 1 more tablespoon of the butter in the skillet until fully melted and bubbling.  Add onions, carrots and garlic.  Stir fry for 2-3 minutes just until onions become translucent and carrots start to become tender.

Add last 2 tablespoons of the butter to the skillet and stir in until melted.  Add rice, scallions and BBQ Pork to the skillet and stir in until well combined.  Stir fry for another 2-3 minutes.  Add soy sauce and eggs.  Stir to combine.  Add toasted sesame oil, stir to combine and remove from heat.

At this point you can serve it or cover it and hold it warm in a 225 oven while you make additional dishes to accompany your Pork Fried Rice.

Makes 4-6 servings.


Wednesday, April 27, 2016

Dealing with Leftovers

We all have leftovers sometimes, but that doesn't mean they have to be boring.  In this first Dealing With Leftovers video episode, I'll show you how I turned restaurant leftovers into quick, portable and tasty breakfast burritos.


What are your tricks for dealing with leftovers?

If you like these types of videos and posts, please let me know in the comments. 

Until next time.  Ciao!


Wednesday, April 20, 2016

Recipe Review: Chinese BBQ Pork


Awhile back, I had a troop of Girl Scouts over and we cooked Chinese food together.  Their Girl Scout Leader happened to have a family recipe for Chinese BBQ Pork which she made a brought along for us to add to the Fried Rice we made and to enjoy on it's own as well.  This really inspired me to renew my efforts to learn to cook Chinese Cuisine and sent me on a search to find my own go-to recipe for Chinese BBQ Pork so I could have it any time I craved it.

I searched and Pinned a couple of recipes to return to later and this recipe from Wanderlust Kitchen is the one I finally decided to try this weekend.

It was super easy to make, tender, juicy and the sauce is exactly right.  I opted to make it without the red food coloring but I made absolutely ZERO changes to the recipe and there is nothing I would change now that I've tried it.

Here's how it goes together:

Starting the night before, I mixed all the ingredients for the marinade in a mason jar...


The pork tenderloin came out of the package in two pieces, I cut each piece in half, pricked them all over with a fork (if there was one think I could have done better, this would be it - next time I'll prick it a bit deeper to really get that distinctive crust on the outside) and placed them in a resealable plastic bag.  Then I  poured half of the marinade on top, sealed the bag and massaged the marinade into the pork (this is easier if you let the air out of the bag when you seal it up).  Place it in the fridge overnight (or at least 6 hours) to marinade.

Before I roasted it, I let it sit on the counter a bit to take the chill off so it would be guaranteed to be tender while I worked on making Gyoza and Asian Noodle Salad to go with it.


It was roasted in a 450 degree oven for 25 minutes, until the internal temperature was 160 degrees.  It looked like this when it came out of the oven:


As per my usual MO, I let it rest several minutes before I sliced it up.


The marinade makes and excellent dipping sauce - I thought I'd have to thicken it up, but it was perfect just as is.  I loved this dish and my lunch guests (aka: Gaming Group) loved it and I will definitely be making this recipe again and again!


Saturday, April 16, 2016

Quick Fix: Flatbread and Pocket Pizzas and an Announcement


Pizza is one of my absolute favorite foods to eat and living where we do, delivery is not an option. That's ok though, because making homemade pizza has always been a thing in my family so I learned how to make it myself at a very young age.  My mom taught us how to make Easy Pizza's using English Muffins but over the years, I've come up with a couple of new ways to make pizza that are equally quick, easy and that really satisfy my pizza craving.

I've been making Pocket Pizzas for a really long time now - they are a favorite of Steven's and I love them because they are perfect for enjoying while watching a movie.  More recently though, with good quality flatbreads being carried at my local grocery store, I've been making pizza with those alot too.

And now for my Announcement (announcements, announcements, announcements....) I've made a video about these pizzas and I am launching on my brand-spankin'-new YouTube Channel!!!!

 I've realized that sometimes photos just aren't enough so I decided to branch out.  Every video I post will have a companion recipe posted here so you can easily locate lists of ingredients and measurements while also having the ability to really see how a particular method or technique works. I hope you'll tune in and subscribe!

Here's the video:


For these pizzas, there really isn't much recipe required, but if you'd like to try the sauce that has ruined all other pizza sauces for my husband, here it is:

Quick Pizza Sauce

1 can Tomato Paste (keep the can)
1 can of water (the empty tomato paste can)
1/2 to 1 tsp Garlic Powder
1/2 tsp Basil
1/2 tsp Oregano
1/2 tsp Parsley flakes
1/4 tsp sugar
salt & pepper to taste

Mix tomato paste and water.  Add remaining ingredients.  Taste the sauce to ensure you have the balance of flavors you like. 

This recipe will make enough sauce for 2, 12-inch pizzas or 6-8 Flatbread or Pocket Pizzas.

Flatbread Pizza 

Pizza Sauce (see above or use your own favorite)
Flatbread (I used Naan)
Pizza Toppings (use your favorite)
Mozzarella Cheese
Parmesan Cheese (optional - I didn't use any in the video)

Preheat oven and pizza stone, if you're using one, at 425 degrees.  

Top flatbread with a generous amount of pizza sauce, spreading it almost to the edges with the back of a spoon.  Top with thin, flat toppings first such as pepperoni, canadian bacon or mushrooms, then add bulkier ingredients such as olives or pre-cooked sausage and finishing with a generous layer of mozzarella cheese.  

Bake at 425 degrees for 10-15 minutes, or until cheese is fully melted and starting to brown in spots.

*You will be able to make 6-8 flatbread pizzas using the sauce recipe above.  We usually just make 2 at a time (1 per person) and eat them several days in a row.

Pocket Pizza

Pizza Sauce (see above recipe or use your own favorite)
Pita Bread
Pizza Toppings (use your favorite)
Mozzarella Cheese

Preheat conventional or toaster oven to 425 degrees.  You can line a baking sheet with foil for extra-easy cleanup, if you like.  

Slice pita bread in half to expose the pocket.  Spread sauce on the bottom, inside surface of the pocket bread.  Layer in your favorite toppings, starting with flat toppings such a canadian bacon or pepperoni, then adding bulkier toppings like olives or sausage, finishing with the cheese.  

Place on a baking sheet and bake for 10-15 minutes until the cheese is fully melted and the pita bread turns golden and crispy.  

*You will be able to make 6-8 pocket pizzas (1 pocket pizza - 2 halves of pocket bread) using the sauce recipe above.


Wednesday, March 30, 2016

Chicken Pot Pie with Cheddar Chive Cobbler Topping


Living in the foothills of the Cascade Mountains in March means plenty of bi-polar weather - pouring buckets one minute, sun shining the next, and high winds 10 minutes later - you just never know what you're going to get from one minute to the next.  For me, it's the final call for winter comfort foods before moving on to the fresh flavors of new spring vegetables and the lighter dishes that will lead the way into summer.

Between the pouring rain with moments of sunshine, springing forward into daylight savings and a late night, I woke up on the late side this morning with the desire to spend the day drinking tea under a cozy blanket watching cooking shows and movies... and craving Chicken Pot Pie.  Somehow I managed to let almost the entire winter pass by without making any of this fabulously comforting dish.  This recipe rectified the situation quite nicely.

Although I love to bake and do bake often, pie crust and I have never quite meshed.  I always seem to end up with too-dry pastry that fails to roll out well and cracks when placed in the pan so I tend to gravitate towards alternate solutions that vary from purchasing store bought crust or frozen puff pastry, to topping the dish with biscuits.  Today I decided I'd simply try it with the cobbler topping used in this Chicken Enchilada Cobbler recipe with just a minor addition of chives.

Let me tell you, it turned out great!  The cobbler topping had a nice, crisp crust while the interior of the cobbler was fluffy and provided the perfect balance for the creamy pot pie filling.  My husband really enjoyed the bigger pieces of chicken and it was just the ticket for a blustery, lazy day, taking less than an hour to make from start to table.  Success!

I already had 1 chicken thigh left marinading in the fridge from some dishes I had made earlier in the week so I started with that and added 1 large chicken breast to a saucepan with about 1 cup of chicken stock  (I went ahead and added the marinade to the pan as well, knowing the olive oil and seasonings would only serve to add more flavor to the overall dish.) and poached the chicken until it was just cooked through).


Meanwhile, I chopped and sauteed some carrots, onions and celery (I was out of potatoes, but feel free to include them) in a couple of tablespoons of butter and a tablespoon of EVOO (the olive oil helps prevent the butter from burning), lightly seasoning the whole works with a bit of salt and pepper.  By the time the veggies were  tender, the chicken was ready so I removed it from the pan and cut it into bite-sized chunks and set it aside.  I added 3 tablespoons of flour to the veggies, stirred it in and let it cook for a couple of minutes before adding milk and the chicken stock I had poached the chicken in.  I stirred this well and let it cook for a bit to gauge the thickness of the sauce.  I ended up adding a couple more tablespoons of stock from the carton before I had the consistency I wanted (about as thick as gravy).  Once I had that dialed in, I added the chicken...


I added some parsley and thyme and just stirred everything together, then I turned off the heat and poured the whole mixture into a small casserole dish that I had already prepared with cooking spray and got to work on my cobbler topping.  Just mix 1 cup of Homemade Baking Mix with some sharp, shredded cheddar cheese and 1 tablespoon chopped chives (I used freeze dried), then mix in 1 cup of milk, 2 eggs and 1 tablespoon of butter, mix well and pour on top of the pot pie filling.


Bake it in a preheated 400 degree oven and bake it for 30 minutes.  It will come out looking like this:


... just look at how beautifully the cobbler topping rose...


Serve it with a salad on the side and your favorite beverage and you're all set!


Here's the recipe:

Chicken Pot Pie with Cheddar Chive Cobbler Topping
serves 4 

Filling
2 boneless, skinless pieces of chicken (I used 1 thigh and 1 breast)
1 cup chicken stock
2 TBLS butter, unsalted
1 TBLS extra virgin olive oil
2 carrots
2 celery stalks
1/2 of a medium, sweet onion
2 medium potatoes (optional)
3 TBLS flour
1/4 cup milk
1 tsp parsley
1 tsp thyme
Salt & Pepper

Cobbler Topping
1 cup baking mix
1 cup sharp cheddar cheese, shredded
1 TBLS butter, melted (*if you use storebought baking mix, omit butter)
1 cup milk
2 eggs
1 TBLS chopped chives (reserve a couple of pinches to sprinkle on top)

Preheat oven to 400 degrees and prepare a small casserole dish with cooking spray or butter.  Melt 1 tablespoon butter and set aside to cool.

For the filling:
Place whole chicken pieces in 1 cup of chicken stock and bring to a boil.  Reduce heat to low and simmer for about 10 minutes.

Meanwhile, cut potatoes into bite-sized pieces and chop onions, carrots and celery into small dice. Preheat a skillet on medium high heat.  Add 2 tablespoons of butter and 1 tablespoon olive oil to skillet and melt butter.  If you're including potatoes, add them to the skillet first and let them cook for several minutes before adding the remaining vegetables.  Saute until all vegetables are tender.

At this point, the chicken should be ready.  Remove the chicken from the pan, reserving the stock. Set chicken aside.

Add flour to vegetables, stirring in and allowing to cook for a couple of minutes.  Stir in milk and allow it to cook briefly, until it thickens to almost to a paste.   Add all of the chicken stock you poached the chicken in.  Stir in and reduce heat to low, allowing sauce to simmer a bit, stirring occasionally while you cut the poached chicken into bite-sized pieces.  Add chicken to filling mixture in skillet.  If the sauce is too thick, you can add more chicken stock or more milk or simply use water to thin it to the desired consistency.  (You want it about as thick as a gravy.)  Pour into prepared casserole dish and set aside.

For the topping:
In a medium bowl or measuring pitcher, mix together baking mix and cheddar cheese.  Pour in milk, melted butter (which should be cool), chives, and eggs.  Mix until it's all combined.  Pour on top of filling in casserole dish.

Bake at 400 degrees for 30 minutes, until nicely browned on top and a toothpick inserted into topping comes out clean.  Allow to set for about 5 minutes prior to serving.  This goes great with a salad or some fresh fruit.

Enjoy!


Sunday, April 29, 2012

Trying Out New Recipes

There are so many recipes I want to share with you, but there are also so many new recipes I want to try. I don't know about you but I'm always on the lookout for something new to add to my repetoire that my family will love and that I won't have to spend hours preparing. So rather than making & photographing my own recipes, I've been trying out lots of new recipes. Here are just a few of the recipes I have tried out so far.

I've recently become addicted to watching Nigella Lawson on the Cooking Channel. I especially enjoy Nigella Express and on one of my trips to the library at the first of the year (I spend a lot of time at my local library) I found the cookbook of the same name. It's absolutely packed with recipes I want to try, so I sticky noted (yes, I really said "sticky noted", no I don't suspect that's an actual word) some of them to try right away. I really love Nigella's approach to cooking - very simple techniques, lots of one pot dishes, very quickly put together, and filled with fresh, quality ingredients that won't break the bank. So Tuesday night we tried out her Sweetcorn Chowder with Toasted Tortillas. It was so simple and so delicious. I don't have a food processer so I used my blender and some of the broth to get the consistency right, but it was, as I said so delicious!

Another Nigella Lawson recipe I tried recently is her and, to be perfectly honest, am already addicted to them. I have made so many batches already they're practically a staple in our pantry now. Amanda pointed out to me that we're out several weeks agot now so I really need to make some more.

Back in January or so, I listened to an audiobook of a favorite book series of mine - the Hannah Swensen Mysteries - maybe you've heard of them? The herione owns a cookie and coffee shop and the books are absolutely filled with recipes - and all the recipes I've tried so far have been absolute winners. Joanne Fluke is the author and I understand all the recipes that go into the book are thoroughly tested. Anyway, I was listening to Key Lime Pie Murder and a cookie called "Chippers" was included in the story. These cookies have potato chips in them - being a "crunchy/salty snacker" myself, I was intrigued, but since I didn't have a hard-copy of the book, I didn't try to copy the recipe. Then, I was reading one of my favorite blogs the other day - Smitten Kitchen - lo and behold, she posted a recipe for Potato Chip Cookies! Of course, I had to try them. They are buttery, shortbready (is that even a word?), cookies with toasted pecans as well as crushed up potato chips. You should hop on over to the Smitten Kitchen, grab the recipe and give it a test drive yourself! I have since wrangled a hard-copy of Key Lime Pie Murder and tried those out too. I have to admit, I like Joanne Fluke's recipe even better. Hers recipe calls for a couple of egg yolks in the dough - so they came together a bit better. In both cases the cookies come out crisp on the outside, chewy on the inside. I did use the Smitten Ktichen's method of rolling the whole dough ball in sugar before flattening - I like them that way very much. You end up with a lovely combination of sweet/salty/crunchy/chewy. Hard to believe, right!? But I am SOLD and wholly addicted to these gems!

Our 15 year old, Arynn, was cast in the production of Les Miserables at her high school this year. She had rehearsals 4 days a week until 6 or 7:00pm - which spells L-A-T-E D-I-N-N-E-R for us. So, one day, after making not just the Potato Chip cookies but also another batch of my signature cookies (I promise, I will post this recipe - someday) for a friend of the family, I decided we'd go with a simple dinner of pasta tossed in butter and parmigiano reggiano and that I'd use my bread machine to make some bread to go along with the pasta. I have a bread machine cookbook and so far the recipes I've tried from it have been pretty good so I decided to try a new recipe from that and chose the Italian Scallion and Herb Bread. It starts with chopped scallions, dried basil, thyme and rosemary sauteed in butter then added to the other ingredients in the bread machine. The photo in the book of this particular bread showed it cut into slender pieces and toasted - so we did the same and it made for a crusty, savory accompaniment to our pasta.

I have also finally gotten around to trying out some recipes I found on Pinterest, but I'll save those for separate posts - FOP (Found On Pinterest) - that I'll try to start posting on some sort of regular schedule TBD later. I'm sure there's more I should be sharing with you but I'll call it good for now and try to get some more posts up (and add photos) in the near future! Until then, Ciao!